大致介紹完名為 Razor 的魔術材料後,要來一一填坑了,首先要介紹的就是路由魔術。
路由是一種檢查瀏覽器 URL 並將其匹配到要呈現的頁面的技術。當同一個應用程式中的 URL 變更時,透過改寫瀏覽器的 URL 來呈現相關的內容,而不像傳統真的切換頁面。
路由器元件
Blazor 是透過 Router 元件來處理路由,並根據指定的 AppAssembly 或者額外指定的 AdditionalAssemblies 來檢測可路由的元件。當瀏覽器導覽時,如果路由與網址相匹配,路由器就會攔截導覽並使用提取的 RouteData 來渲染其 Found 元件的內容,若匹配不到則渲染 NotFound 元件的內容。
專案初始化時就會在 App.razor 產生以下內容:
1 | @* App.razor *@ |
這邊簡單的介紹一下 Router 元件:
AppAssembly用於設定或取得組件,該組件下的可路由元件能被路由檢測。AdditionalAssemblies用於設定或取得額外的組件集,也就是當可路由元件在其他類別庫時能被檢測。1
2
3
4
5<Router
AppAssembly="@typeof(Program).Assembly"
AdditionalAssemblies="new[] { typeof(Component1).Assembly }">
...
</Router>Found用於設定或取得當路由匹配成功時所顯示的內容。NotFound用於設定或取得當路由匹配失敗時所顯示的內容。
RouteView 顯示指定的頁面元件,並可設定預設的版面配置。
RouteData設定或取得路由資料,這決定了顯示的頁面以及提供給該頁面的參數值。DefaultLayout設定或取得預設的版面配置,當指定的頁面元件無設定版面配置時使用,會在後面介紹版面配置時詳細說明。
建立元件
若要將元件變成可路由元件,我們需要透過 @page 指示詞,但在此之前,先來建立一個 CustomPage.razor 檔案吧!
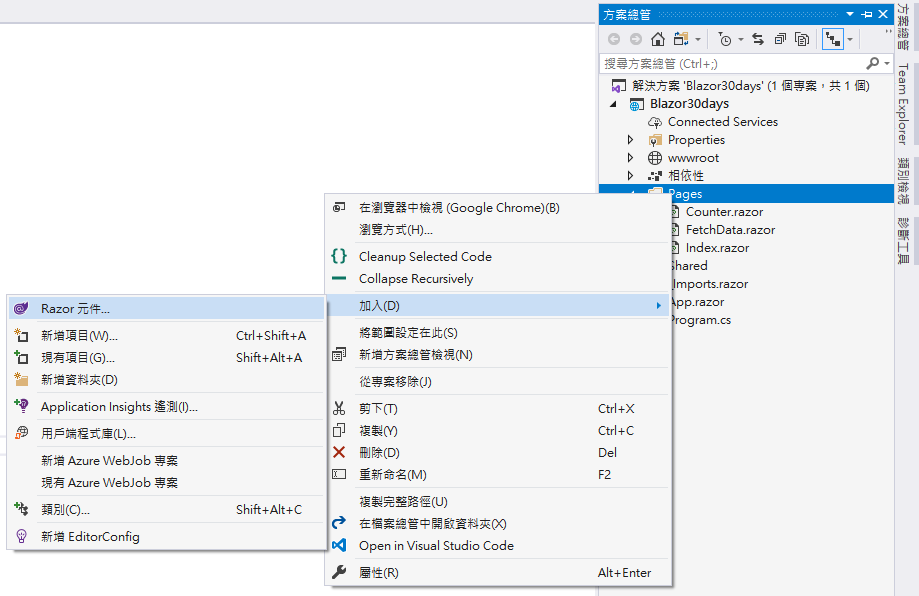
一樣透過 Visual Studio 2019 的畫面來做示範,首先需開啟方案總管並對 Pages 資料夾點擊右鍵,加入Razor 元件。

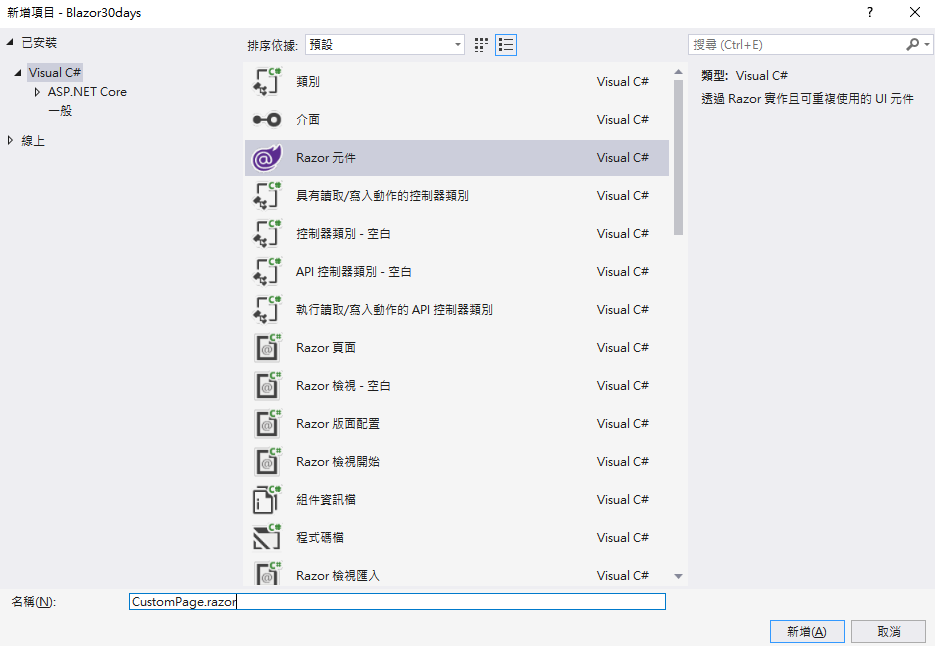
然後確認建立的是Razor 元件並取名為 CustomPage 或者任何你喜歡的名字後按下新增。

咒術師可以輸入 dotnet new razorcomponent -o Pages -n CustomPage 來做一樣的事情。
可路由元件
將一個元件變成可路由元件需要透過 @page 指示詞,也就是設定該頁面元件的進入點:
1 | @* CustomPage.razor *@ |
可以看到使用了三個 @page,因為進入點可以不只一個!也就是當路由為 /custompage 或 /custompage2 以及 /custompage/xxx 都會進入這個元件。這邊的 {text} 為路由參數,路由器會將路由參數的名稱填入到相同名稱的元件參數(不區分大小寫)。
需注意:路由參數並不支援選擇性參數且不能包含空白
使用路由參數時也可以加上條件約束,來強制比對路由參數與元件參數類型是否一致,若不一致則視為路由匹配失敗。
1 | @page "/custompage" |
當路由為 /custompage/1 或 /custompage/1000 能進入這個元件,但 /custompage/text 則無法進入。
而路由參數支援的條件約束有:
| 條件約束 | 範例 | 範例符合的項目 |
|---|---|---|
| bool | {active:bool} |
true, FALSE |
| datetime | {date: datetime} |
2020-09-21, 2020-09-21 20:20pm |
| decimal | {price:decimal} |
29.99, -1,000,000 |
| double | {weight:double} |
1.234 |
| float | {weight:float} |
12.34 |
| guid | {id:guid} |
CD2C1638-1638-72D5-1638-DEADBEEF1638, {CD2C1638-1638-72D5-1638-DEADBEEF1638} |
| int | {id:int} |
1 |
| long | {id:long} |
123 |
為了確保 URL 可以轉換成 CLR 類型的路由條件約束(如 int, DateTime),一律使用不因國別而異的文化特性,並假設 URL 不可當地語系化。
以上就是 Blazor WebAssembly 針對路由的設定與處理。
感謝大家的閱讀,我們明天見。